2015-11-06 2 views
4

Мне нужно создать ящик для навигации, такой как flipkart или приложение для управления файлами Astro. Как заменить ListView на расширяемый listView?как создать расширяемый listView внутри навигационного ящика?

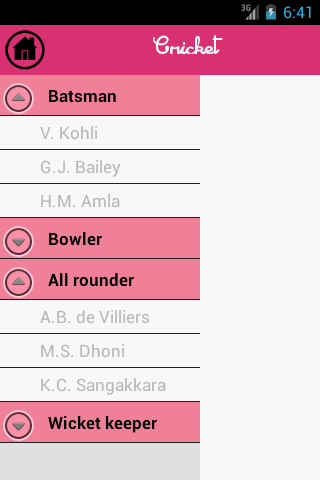
мне нужна панель навигации, как это - Image это мой XML

<LinearLayout xmlns:android="http://schemas.android.com/apk/res/android" 
xmlns:tools="http://schemas.android.com/tools" 
android:layout_width="match_parent" 
android:layout_height="match_parent" 
xmlns:app="http://schemas.android.com/apk/res-auto" 
android:orientation="vertical" 
tools:context=".MainActivity"> 
<include 
    layout="@layout/toolbar" 
    android:layout_width="match_parent" 
    android:layout_height="wrap_content" /> 


<!-- This DrawerLayout has two children at the root --> 
<android.support.v4.widget.DrawerLayout 
    android:id="@+id/drawer_layout" 
    android:layout_width="match_parent" 
    android:layout_height="match_parent"> 

    <!-- This LinearLayout represents the contents of the screen --> 
    <LinearLayout 
     android:layout_width="match_parent" 
     android:layout_height="match_parent" 
     android:orientation="vertical"> 

     <!-- The main content view where fragments are loaded --> 
     <FrameLayout 
      android:id="@+id/flContent" 
      android:layout_width="match_parent" 
      android:layout_height="match_parent" /> 


    </LinearLayout> 
    <!-- The navigation drawer that comes from the left --> 
    <!-- Note that `android:layout_gravity` needs to be set to 'start' --> 

    <android.support.design.widget.NavigationView 
     android:id="@+id/nvView" 
     android:layout_width="wrap_content" 
     android:layout_height="match_parent" 
     android:layout_gravity="start" 
     android:background="@android:color/white" 
     app:headerLayout="@layout/nav_header" 
     android:choiceMode="singleChoice" 
     app:menu="@menu/drawer_view" /> 

</android.support.v4.widget.DrawerLayout> 

+0

Пожалуйста, покажите нам, что вы делали до сих пор. – Emil

+0

Я только что создал обычный навигационный ящик с списком ListView –

+0

. Вместо этого вы расширяете список, а ваше преимущество - – Bhargav

ответ

3

Вы можете создать ExpandableListView и использовать его в качестве NavigationView. Пример результата XML:

<LinearLayout xmlns:android="http://schemas.android.com/apk/res/android" 
xmlns:tools="http://schemas.android.com/tools" 
android:layout_width="match_parent" 
android:layout_height="match_parent" 
xmlns:app="http://schemas.android.com/apk/res-auto" 
android:orientation="vertical" 
tools:context=".MainActivity"> 

<include 
    layout="@layout/toolbar" 
    android:layout_width="match_parent" 
    android:layout_height="wrap_content" /> 

<!-- This DrawerLayout has two children at the root --> 
<android.support.v4.widget.DrawerLayout 
    android:id="@+id/drawer_layout" 
    android:layout_width="match_parent" 
    android:layout_height="match_parent"> 

<!-- This LinearLayout represents the contents of the screen --> 
<LinearLayout 
    android:layout_width="match_parent" 
    android:layout_height="match_parent" 
    android:orientation="vertical"> 

    <!-- The main content view where fragments are loaded --> 
    <FrameLayout 
     android:id="@+id/flContent" 
     android:layout_width="match_parent" 
     android:layout_height="match_parent" /> 


</LinearLayout> 
<!-- The navigation drawer that comes from the left --> 
<!-- Note that `android:layout_gravity` needs to be set to 'start' --> 

<ExpandableListView 
      android:id="@+id/lvExp" 
      android:layout_height="match_parent" 
      android:layout_width="match_parent" 
      android:layout_gravity="start"/> 

</android.support.v4.widget.DrawerLayout> 

Вы можете найти пример использования в ExpandableListView here

+0

расширяемый listVIew работает, но я не могу использовать заголовок в расширяемом listView –

0

Вы должны сделать ExpandableListView в вашем NavigationDrawer вы выполните забросить эти ссылки и применить How to create drawer navigation like this? и list and expandable list in single drawer надеюсь, что это поможет вам

+0

Мне также нужно использовать представление заголовка в навигации выдвижной ящик . –

0

<android.support.design.widget.NavigationView 
    android:id="@+id/nav_view" 
    android:layout_width="240dp" 
    android:layout_height="match_parent" 
    android:layout_gravity="start" 
    android:fitsSystemWindows="true" 
    app:headerLayout="@layout/nav_header_main" 
    app:itemIconTint="@color/colorPrimary" 
    app:itemTextAppearance="@style/TextAppearance.AppCompat.Body2"> 


    <ExpandableListView xmlns:android="http://schemas.android.com/apk/res/android" 
     xmlns:tools="http://schemas.android.com/tools" 
     android:id="@+id/navigationmenu" 
     android:layout_width="wrap_content" 
     android:layout_height="wrap_content" 
     android:layout_marginBottom="41dp" 
     android:layout_marginTop="90dp" 
     android:background="@android:color/white" 
     android:choiceMode="singleChoice" 
     android:dividerHeight="1dp" 
     android:groupIndicator="@null" 
     android:listSelector="@color/colorAccent" /> 

    <Button 
     android:id="@+id/session_logout" 
     android:layout_width="match_parent" 
     android:layout_height="40dp" 
     android:layout_gravity="bottom" 
     android:background="@color/colorPrimary" 
     android:text="Logout" 
     android:textColor="#fff" /> 

</android.support.design.widget.NavigationView> 

0
<?xml version="1.0" encoding="utf-8"?> 
<LinearLayout xmlns:android="http://schemas.android.com/apk/res/android" 
    android:layout_width="match_parent" 
    android:layout_height="match_parent" 
    android:background="#FFFFFF" 
    android:orientation="vertical"> 

    <RelativeLayout 
     android:layout_width="match_parent" 
     android:layout_height="52dp" 
     android:background="@color/themeColor" 
     android:padding="10dp"> 

     <ImageView 
      android:id="@+id/home" 
      android:layout_width="35dp" 
      android:layout_height="35dp" 
      android:layout_gravity="center_vertical" 
      android:layout_marginLeft="5dp" 
      android:background="@drawable/menu_icon" /> 

     <TextView 
      android:id="@+id/appname" 
      android:layout_width="wrap_content" 
      android:layout_height="wrap_content" 
      android:layout_marginLeft="15dp" 
      android:layout_marginTop="5dp" 
      android:layout_toRightOf="@+id/home" 
      android:gravity="left|center_vertical" 
      android:text="Home" 
      android:textColor="#FFFFFF" 
      android:textSize="20dp" /> 

     <ImageView 
      android:id="@+id/imageView2" 
      android:layout_width="35dp" 
      android:layout_height="35dp" 
      android:layout_alignParentRight="true" 
      android:layout_centerVertical="true" 
      android:layout_gravity="center_vertical|right" 
      android:src="@android:drawable/ic_menu_share" /> 

     <ImageView 
      android:id="@+id/imageView3" 
      android:layout_width="25dp" 
      android:layout_height="25dp" 
      android:layout_gravity="center_vertical" 
      android:layout_marginBottom="5dp" 
      android:layout_marginLeft="5dp" 
      android:layout_marginRight="10dp" 
      android:layout_marginTop="5dp" 
      android:src="@drawable/setting" 
      android:visibility="gone" /> 

    </RelativeLayout> 

    <android.support.v4.widget.DrawerLayout xmlns:android="http://schemas.android.com/apk/res/android" 
     android:id="@+id/drawer_layout" 
     android:layout_width="match_parent" 
     android:layout_height="0dp" 
     android:layout_weight="1"> 

     <!-- Drawer Content --> 

     <FrameLayout 
      android:id="@+id/content_frame" 
      android:layout_width="match_parent" 
      android:layout_height="match_parent" 
      android:layout_marginTop="10dp" /> 

     <!-- The navigation menu --> 
     <LinearLayout 
      android:id="@+id/header" 
      android:layout_width="260dp" 
      android:layout_height="match_parent" 
      android:layout_gravity="left" 
      android:background="@color/colorDrawer" 
      android:orientation="vertical"> 

      <ImageView 
       android:id="@+id/imageView" 
       android:layout_width="wrap_content" 
       android:layout_height="50dp" 
       android:layout_gravity="top" 
       android:paddingLeft="50dp" 
       android:paddingRight="50dp" 
       android:paddingTop="5dp" 
       android:src="@drawable/logo" /> 

      <TextView 
       android:id="@+id/textView2" 
       android:layout_width="match_parent" 
       android:layout_height="1dp" 
       android:background="@color/colorDrawerText" /> 

      <ExpandableListView 
       android:id="@+id/lvExp" 
       android:layout_width="match_parent" 
       android:layout_height="match_parent" 
       android:layout_marginTop="10dp" 
       android:background="@color/colorDrawer" 
       android:choiceMode="singleChoice" 
       android:groupIndicator="@android:color/transparent" 
       android:listSelector="@color/themeColor"></ExpandableListView> 

     </LinearLayout> 

    </android.support.v4.widget.DrawerLayout> 
</LinearLayout> 

    <!--android:groupIndicator="@null"--> 

This is done going through the androihive.com tutorial - "ExpandableListView example" =============Link for your reference is http://www.androidhive.info/2013/07/android-expandable-list-view-tutorial/ 
Vinod Kumar Gaur 
+0

, пожалуйста, уточните больше, чем просто введите некоторые коды – Pooya