Существует одна пример программы python в dlib для определения позиции ориентира лица. face_landmark_detection.pyКак получить координаты позиции точки в программе определения ориентира лица dlib?
Эта программа обнаруживает функцию лица и обозначает ориентиры с точками и линиями на исходной фотографии.
Интересно, можно ли получить координатное положение каждой точки. Как (10, 25). «a» обозначает угол рта.
После небольшой модификации программы для обработки одного снимка за один раз, я стараюсь распечатать значение dets и формы без успеха.
>>>print(dets)
<dlib.dlib.rectangles object at 0x7f3eb74bf950>
>>>print(dets[0])
[(1005, 563) (1129, 687)]
Аргументы для обозначения наземных ориентиров лица и тип данных до сих пор остаются неизвестными. А вот упрощенный код
import dlib
from skimage import io

#shape_predictor_68_face_landmarks.dat is the train dataset in the same directory
predictor_path = "shape_predictor_68_face_landmarks.dat"

detector = dlib.get_frontal_face_detector()
predictor = dlib.shape_predictor(predictor_path)
win = dlib.image_window()

#FDT.jpg is the picture file to be processed in the same directory
img = io.imread("FDT.jpg")

win.set_image(img)

dets = detector(img)

print("Number of faces detected: {}".format(len(dets)))
for k, d in enumerate(dets):
    print("Detection {}: Left: {} Top: {} Right: {} Bottom: {}".format(
     k, d.left(), d.top(), d.right(), d.bottom()))
    # Get the landmarks/parts for the face in box d.
    shape = predictor(img, d)
    #print(shape)
    print("Part 0: {}, Part 1: {} ...".format(shape.part(0),
               shape.part(1)))
# Draw the face landmarks on the screen.
win.add_overlay(shape)

win.add_overlay(dets)
dlib.hit_enter_to_continue()
--------------------------- обновление 3.10.2016 ---- -----------------------
Сегодня, я помню метод help() в python и имею пробную версию с ним.
>>>help(predictor)

Help on shape_predictor in module dlib.dlib object:

class shape_predictor(Boost.Python.instance)
| This object is a tool that takes in an image region containing
some object and outputs a set of point locations that define the pose
of the object. The classic example of this is human face pose
prediction, where you take an image of a human face as input and are
expected to identify the locations of important facial landmarks such
as the corners of the mouth and eyes, tip of the nose, and so forth.
В исходном коде, переменная shape является выходом метода предсказателя.
>>>help(shape)
Описание формы
class full_object_detection(Boost.Python.instance)
| This object represents the location of an object in an image along
with the positions of each of its constituent parts.
----------------------------------------------------------------------
| Data descriptors defined here:
|
| num_parts
|  The number of parts of the object.
|
| rect
|  The bounding box of the parts.
|
| ----------------------------------------------------------------------
Кажется, что переменная shape связана с точками координат положения.
>>>print(shape.num_parts)
68
>>>print(shape.rect)
[(1005, 563) (1129, 687)]
Я предполагаю, что обозначены граничные точки лица 68.
>>> print(shape.part(68))
Traceback (most recent call last):
    File "<stdin>", line 1, in <module>
IndexError: Index out of range
>>> print(shape.part(65))
(1072, 645)
>>> print(shape.part(66))
(1065, 647)
>>> print(shape.part(67))
(1059, 646)
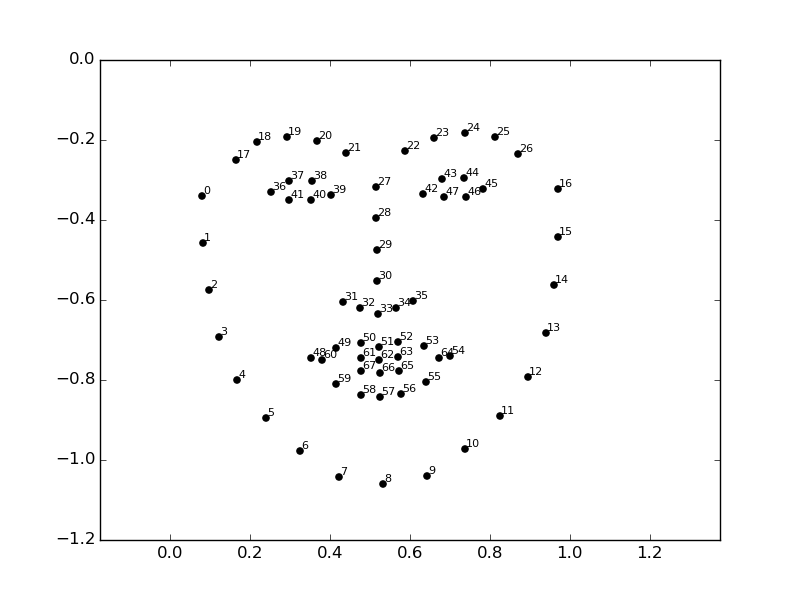
Если это правда. Оставшаяся проблема заключается в том, какая часть отвечает, на какой грани стоит точка.
вы можете обнаружить точки и рисовать их номера на изображении. или вы можете посмотреть здесь https://matthewearl.github.io/2015/07/28/switching-eds-with-python/ – Evgeniy
Вау, это хорошая идея. –
Проверить здесь, http://www.pyimagesearch.com/2017/04/03/facial-landmarks-dlib-opencv-python/ – saurabheights